Tag Archives: cooking with kids

Homemade Pizza

11 Aug

I know, I know- 5 dollar pizza and a slew of other pizza joints are just a phone call away-but why buy it when you can make it?! My family loves making their own little personal pizzas. I like to gather a lot of toppings and watch them create their own masterpieces! We did this recently and had ourselves a carpet picnic while watching Elf and the kiddos can’t wait to do it again! I promise yeast isn’t as scary as it sounds;) I hope you enjoy!

This is all you need to make dough: 3/1/2-4 C of flour (bread flour will
give you a crispier crust, all purpose will give you a chewier crust). 1 Pkg.
dry yeast, 1 tsp of sugar, 1 1/2 tsp salt, 2 TBSP olive oil, 1 1/2 C really warm water
110 degrees (run water on wrist water should be just shy of hot feeling).
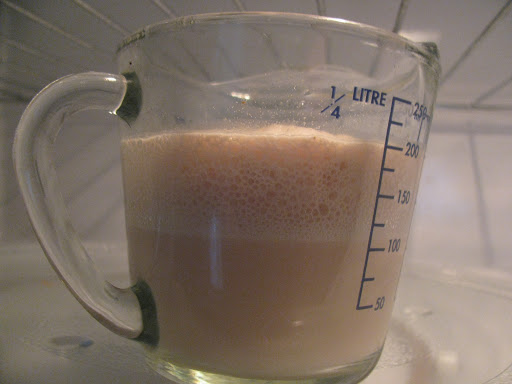
You gotta wake your yeast up! I used 1/2 of my warm water, the sugar,
and the package of yeast. Give it a quick stir and let in proof for about 10
minutes. This is what it should look like. Bubbling over with happiness.
Add 3 1/2 C of your flour, salt, oil, remaining warm water, and yeast mixture to a large bowl
or in my case my stand mixer. If you don’t have a stand mixer, mix all ingredients
well in large bowl and then turn out dough on a well floured surface and knead
until smooth like a baby’s tushie and elastic-when you stretch it long it
shrinks back quickly to its previous size. Takes about 5-10 minutes. If you have a stand mixer-just throw
all ingredients in bowl and using your dough hook mix about 5 minutes. The results should be the same
as with the hand kneading technique.
Oil a large bowl and place the dough in it and brush the top of the dough lightly with oil.
Cover with a towel or plastic wrap and it will need to nap for about 1 hour or until
doubled in size.
*If dough is too sticky knead in the remaining 1/2 C flour.

                                          Punch down your dough, literally, and turn out on a flat surface.
                                                  Divide dough accordingly to your family. The kids’ pizza dough was
                                                  measured about baseball size (2 of those) and hubby and I split the
                                                  remaining dough in half. Work the dough into whatever shape and
                                                  thickness you want.
                                                  *Preheat oven to 500 and if you have one preheat your pizza
                                                    stone. Baking pan works fine too!

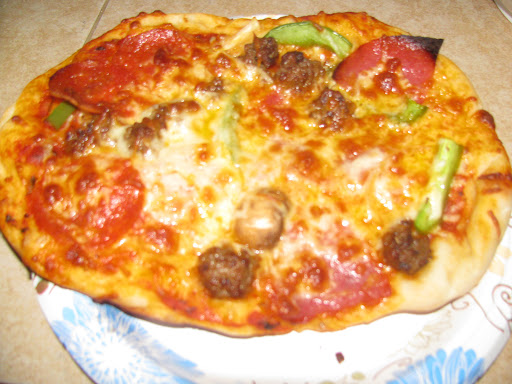
                                          Lay out your ingredients and let your family have fun creating thier
                                                   own pizza.

                                          Getting ready to bake!

                                          About 15-20 minutes later-it’s ready! See, happy faces and sweet memories!

Ta da! Easy Peasy!
I hope you enjoy!
Be Blessed and be a Blessing~
Rebecca
Follow me on Pinterest

Copyright © 2013 · All Rights Reserved · www.andasprinkleoflove.com

Cheesesteak Stuffed Peppers

7 Aug

I know in a bid to make healthier food choices many people are jumping on the low carb wagon. I saw a similar recipe online and tweaked it to suit my families taste.  Keep reading to see their reaction and to get a printable recipe.

What you’ll need.
In a large skillet heat butter and oil.
Caramelize the veggies

Remove pepper shells from oven and pour out excess water in each shell.

 
Place a slice of Provolone cheese at the bottom of each pepper.
(One left cheese less for my son who sometimes doesn’t like cheese)
Fill each pepper with filling.

Top each with another slice of Provolone.

 Place in 400 degree oven for 15 minutes and voila! Cheesesteak
                    stuffed peppers. And the verdict is………………..

Thumbs up for the cheese less wonder.

And an ‘eh’ from the Broukie Bear. Hubby really liked it but he missed
the bread.  I really enjoyed it and I will be making this again!
*Prebaking the green peppers allows them the chance to become a little more tender but it also allows some of the moisture to cook out. This prevents it from being mushy and soggy.
*Salt draws moisture out of the onions and mushrooms and waiting to salt the veggies at the end of cooking allows the veggies to caramelize quicker.
I hope you enjoy!
~Be Blessed and be a Blessing~
Rebecca
Follow me on Pinterest
rhm

Copyright © 2013 · All Rights Reserved · www.andasprinkleoflove.com

Dreamy Creamy Chicken Burritos

3 Aug
 

This is easily one of our favorite meals and it is the most requested by my extended family and friends. Simple, delicious, and slow cooker friendly! Keep reading to get the printable recipe.

You will need: 1-10.5 Oz can of cream of chicken soup, 3/4 C salsa,
3/4 C sour cream, 1/3 C milk, 1-4oz can chopped green chilies and 1 C shredded cheese.
Combine all ingredients and mix well. Set aside.
I sprayed a Pyrex baking dish with non stick spray and added a little
salsa on the bottom of the pan, this keeps the tortillas from sticking
to the bottom of the baking dish.
 
 
Cook up the chicken and add the sauce.
Spoon chicken mixture onto tortilla and sprinkle with a little more cheese.
.
Add the rest of the sauce evenly over the tortillas and add the rest
of the cheese over the top.
Let rest for 5 minutes before cutting.
That is if you can wait that long! Enjoy!

Printable Recipe

This is also an awesome dip- I put the chicken mixture in a slow cooker and serve with tortilla chips.  Serve with shredded lettuce, fresh diced tomatoes and extra sour cream or salsa!  Serve this at your next potluck or dinner party and I promise everyone will want to leave with a copy of the recipe!
~Be Blessed and Be a Blessing~
Rebecca
Follow me on Pinterest 
Linked up with:
LivingWell
                                                                                                                                              ~Luvmybebebugs~                  


Copyright © 2013 · All Rights Reserved · www.andasprinkleoflove.com

Fix it and Forget it Pork Chop Bake

30 Jul

It’s true…making homemade scalloped potatoes is not scary-in fact it is almost fool proof (trust me). This recipe was born out of my love for the potatoes but not of the strange looking dehydrated like potatoes you can buy in the box. This is a fix it a forget it meal. So versatile and you can easily add in extra ingredients and flavors to fit your likes. I will share the basic recipe and from there have fun making it your own!

Ingredients needed to get started.
First step add1-2 bouillon cube (s) to 1 3/4 C water and bring to a boil and remove from heat.
You want the bouillon cube to dissolve. Or go ahead and use equivalent already prepared stock (14 oz.)
In a large skillet  heat 1-2 Tbsp olive oil over med-high heat.
Season your chops with salt and pepper.
Add pork chops to pan and brown both sides-3-4 minutes per side.
While chops are frying prep your potatoes.
Nice and golden on both sides.
Add your sliced onions to the same pan. Let the onions cook in the drippings
Remove onions from pan.
Melt 2 Tbsp butter in hot pan.
Add the flour and whisk to make a roux.
Add in the chicken broth and cream of chicken soup( and optional cheese.and any other veggie add ins).Add the onions back in and turn heat to low.
Butter a 13×9 (or whatever works for you) casserole dish. And arrange
potatoes in an overlapping stacking pattern (yes, it is OK to arrange the potatoes in 2 layers-
it will still cook evenly and thoroughly).
Pour sauce over potatoes-no need to mix.
Lay pork chops on top of potatoes. No need to press them down.
Cover with foil and bake in a 350 oven for 65-75 minutes or for extra tender chops bake in
a 300 degree oven for 2-2 1/2 hours.
Ta-Da! Remove foil and let sit for 10 minutes to give the sauce a chance to thicken.


Click Here For Printable Recipe

See-easy 🙂  You can also make this ahead of time and stick it in your fridge until you are ready to cook. Just remove from fridge 30 minutes before baking to allow the pork chop bake to come to room temperature (ensures even cooking time and keeps meat from being tough).
Try adding sauteed mushrooms, different cream soups such as cream of mushroom or cream of celery, or our favorite green beans. Season with your favorite herbs and spices to give it even more flavor.  Try adding some grated cheese to the sauce-makes the dish even more decadent! This is also an easy meal to put together to bring to a sick friend or a family with a new baby.
~ Be Blessed and be a Blessing~
Rebecca
Come find me on Pinterest!
rhm

Copyright © 2013 · All Rights Reserved · www.andasprinkleoflove.com

These Muffins are Bananas!

24 Jul

Let me tell you, I fail miserably at banana bread.  Burnt on the bottom, raw in the middle, deflated..I am not kidding! If there was a way to ruin it, I would. I have been on a mission to find the right combination of ingredients to yield a moist flavorful banana bread that cooks evenly throughout.  After a lot of trial and error…. I got to mixing and……..Houston, we got ourselves a winner;) I am really excited to share this simple yet delicious recipe for chocolate chip banana muffins. Let’s get baking!

You will need:
To preheat your oven to 400 degrees
3 very ripe bananas-1/2 C vegetable oil- 1/2 C sugar- 2 eggs-
1 tsp. vanilla-1 tsp baking powder-1/2 tsp baking soda-1/2 tsp salt-
1/2 tsp cinnamon-1 2/3 C all purpose flour-3/4 C chocolate chips-
cupcake pan-12 cupcake liners
Start off by adding 2-3 heaping Tablespoons of your already
measured out flour and add them to the chocolate chips. Why?The flour coats the chocolate chips and keeps them from sinking to the bottom of the batter.


Peel your 3 ripe bananas and with a fork mash them down well.
It is OK for there to still be lumps in the bananas


Add the oil and the eggs to the mashed bananas and give it a quick whisk.
Next, add the vanilla extract and sugar and whisk well to combine.
Add in the baking powder, baking soda, salt and cinnamon and give it another whisk.
Whisk in the flour. Lastly gently fold in the chocolate chips.
Fill your cupcake liners with the muffin batter. If you use a 1/4 C
measuring cup you will get exactly 12 muffins. This is the first muffin
recipe that has ever worked out like that for me! YAY!
Bake 15-18 minutes at 400 degrees. Because ovens vary I would
check at about the 15 minute mark to see if they are cooked through.
If not continue to check at 2 minute intervals to be sure they don’t
over bake. They are finished when a toothpick inserted into the center of
the muffin comes out clean with no crumbs or batter stuck to it.
Remove from oven and let cool for 15-20 minutes before you bite into
these delicious muffins.
Recipe
3 very ripe bananas
1/2 C vegetable oil
1/2 C sugar
2 eggs
1 tsp vanilla extract
1 tsp baking powder
1/2 tsp baking soda
1/2 tsp salt
1/2 tsp cinnamon
1 2/3 C all purpose flour
3/4 C chocolate chips
12 cupcake liners
cupcake pan
and a sprinkle of love
Preheat oven to 400 degrees and line your cupcake pan with the liners.
Add 2-3 heaping Tablespoons of your measured flour into the chocolate chips and mix well to coat the chips.
Peel bananas and mash well with a fork. Add oil and eggs to the banana mixture and whisk together.
Next, add vanilla extract and sugar and whisk to combine.
Add the baking powder, baking soda, salt and cinnamon: whisk well.
Add the all purpose flour and whisk well. Fold in the chocolate chips.
With a 1/4 C measuring cup start filling the liners with your batter (Remember, using a 1/4 C measuring cup will give you exactly 12 muffins).
Bake in a 400 degree oven for 16-18 minutes or until a toothpick inserted in the center of the muffin comes out clean. Cool 15-20 minutes and enjoy!
Makes 12 muffins
These muffins turned out moist and flavorful just as I had hoped. The balance of flavors is perfect. As always you can personalize this recipe to reflect the likes of you and your family. The muffins would also be delicious with some chopped walnuts mixed in the batter.
 
I hope you enjoyed this recipe as much as my family did! Thanks for taking the time to stop by!
~ Be Blessed and be a Blessing~
Rebecca

Copyright © 2013 · All Rights Reserved · www.andasprinkleoflove.com